
Instructions for the Tone³
Download a PDF version
(131k)
![]()
Adobe Acrobat reader needed.
Adobe, Acrobat, and the Acrobat logo are trademarks of Adobe Systems Incorporated.
The Tone³ (pronounced "Tone Cube") was designed as a testing tool
and a learning tool. Its primary use has been to test new film and developer
combinations. It has also been used as an instructional tool to help in
understanding exposure, light ratios, and contrast. The Tone³ consists
of three tones - black, white, and gray - which are configured so that
each tone is next to itself as well as the other two tones. In other words,
the cube is made up of three pairs of tones. It's the relationship of
these tones that makes the Tone³ so useful.
The Tone³ is easy to assemble. Open the sides and fold the flaps
in place. If you plan on using the Tone³ in a studio, the flaps can
be glued into place for permanence. If any of the panels separate from
the box they may also be glued back into place (a small amount of white
glue is suggested). If you plan on transporting the Tone³, you may
wish to disassemble it to carry more easily. With care, the Tone³
can be assembled and disassembled with no problem. It can be cleaned,
gently, with a damp, lintless cloth.
To get the most use out of the Tone³, a basic understanding of meters
and exposure is helpful. If you understand these well - such as advanced
zone system practitioners - feel free to skip ahead.
There are two kinds of meters: the incident meter, which usually reads
the light striking a white translucent dome; and the reflected meter,
which reads the light reflected back from an object. Camera meters are
reflected meters (with rare exceptions), meaning the reflectance of the
subject will affect the reading. Manufacturers have standardized on a
reflectance of 18%, which falls visually about halfway between maximum
black and maximum white (the eye does not respond in a straight line to
tonal changes).
Since most meters read an average of the tones in a scene and most scenes
contain many tonal levels, this standardization can work well for average
photos. When attempting to read a single tone, metering becomes more difficult.
Your camera meter thinks everything is 18% gray. If you were to photograph
a white board at the meter reading, it would print as gray in the final
photograph.
Although your camera shoots at a single exposure - for example, at f/8
at 1/250 - there are many levels of exposure in a scene. These many levels
are broken down into three broad areas. The lighter areas of a scene are
called the highlights, while the darker areas are the shadows, and in
between are the midtones.
Evaluating these areas will mean different things to a portrait photographer than to a landscape photographer. You must decide what is important to your own work.
For the example above at f/8 at 1/250, a close-up meter reading of a highlight might be at f/22 at 1/250 (we'll keep the shutter speed constant to simplify things). In the same scene, close-up metering of the darkest shadow might indicate f/4 at 1/250. This should produce a full-toned image with the above exposure. In practice, black-and-white film should retain detail in areas two stops darker than the camera exposure and three stops lighter. This does depend, however, on using the proper film speed, film exposure, and film developing.
The Tone³ can be used to test for the proper film speed, and to be
certain that with the correct exposure, shadow detail will be retained.
By looking at the highlight side of the cube in the final photo, the film
developing can also be evaluated.
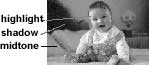
Highlights and shadows can mean different things in portraits...
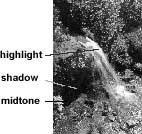
...than in landscapes.
This is simplified by the construction of the Tone³. Because of its configuration, the cube can be placed in such a way as to find the most extreme tonal range (white side in the sunlight and black in the shade, for example) or just to find a normal range (white and black both in direct sunlight), or even to see and learn about light ratios (white in the sun and shade, gray in the sun and shade, and so forth).

Having two of the same tones -
here white - facing the camera reveals the light ratio.
The same tones in light and shade (both white, for example) will reveal
the light ratio. If the side hit by light is 2 stops brighter than the
shaded side (e.g., f/11 compared to f/5.6), the light ratio is 4:1 - two
stops being four times brighter. Understanding light ratio can be especially
important to portrait photographers. It also has an effect on the contrast
of the resulting negative (and therefore print).
Exposure range is the difference between the lightest tone and the darkest tone in a scene. Exposure range can change even while the light and light ratio remain the same. In the above case, having the black side facing the light source and the white side in the shade will produce a lower exposure range (perhaps 1:1) than the white side toward the light and the black in the shade (possibly 16:1 or greater). Seeing how the various sides reflect light can be very educational.

Light ratio can change with a change in light direction.

With a black panel facing the light and a white panel in the shade,
the contrast will be low because the exposure range is low..
Use of the Tone³ is straightforward. When put in a scene, the Tone³ allows you to take three readings - shadow, midtone, and highlight. On initial use, I would recommend writing down your meter readings and camera settings. This makes it easier to determine what went right and what you need to change the next time you shoot and develop your film.

When a white panel faces the light and a black panel is in the shade, the contrast will be high since the exposure range is high. Notice the light ratio has not changed in either shot.
Light readings should be made with a spotmeter or a reflected meter used very close to the tone. If you are using your camera's meter, do not worry if you can't focus that closely. Fill the frame with the tone, making sure you are not affecting the reading by blocking light, and meter without focusing. Since you are metering for a tone, the focus is not critical. In fact, focusing too close can affect the reading due to lens extension factors which reduce the amount of light reaching the focal plane.
The midtone of the Tone³
is an 18% gray and should give you an average reading. Most black-and-white
photographers prefer to use meter readings of shadow areas to determine
exposure (although some portraitists choose to use a midtone). To retain
detail in a shadow area, the camera exposure should be two stops less
than the shadow reading. For example, if you get a meter reading of f/5.6
off the shadow side of the cube, the camera exposure should be f/11 (at
the same shutter speed). This is the equivalent of placing the shadows
in Zone III in the zone system. Note that oftentimes this derived camera exposure (f/11 in our example) might be different from the
reading off of the 18% gray tone (which could easily be f/16 or f/8 in
the above example, depending on conditions). This is why 18% gray cards
give you average results. Understanding that exposure affects the shadows
significantly can help you to retain shadow detail in your black-and-white
photographs.
You can also read a highlight panel of the Tone³ to
see where it falls in relation to the camera exposure. To retain detail
in a highlight, it should not be more than three stops brighter than the
camera exposure. If as in the above example, f/11 is the (derived) camera
exposure, the brightest highlight should be no more than f/32.
If your tones fall within these limits - shadows two stops
darker and highlights three stops lighter than the camera exposure - shoot
and develop the film normally. After printing, you can determine how good
the negatives are. I suggest using a maximum black test to determine the
best print exposure, though other methods will work. My book, Mastering
Black-and-white Photography, covers this in detail, as do other books.
Looking at the final print, if the shadows lack detail (are too dark on
the print), you need to lower the film speed. Lowering the film speed
a notch or two is suggested, e.g., from ISO 400 to EI 320 or 250. If you
bracketed your film exposures, you can use the brackets to more precisely
determine the film speed by choosing the print with the best shadow detail.
Since film developing affects highlights most, you can determine whether
the film developing is correct by looking at the highlight panel in the
final print. If the highlights are too light (lacking detail), the film
developing time needs to be cut back. A good starting point is cutting
the film developing back by about 20%. On the other hand, if the highlights
are too dark (too thin on the negative), the film developing needs to
be increased (try 10% to 20%). These assume you photographed a normal
contrast scene. You should be aware that photographing a high contrast
scene results in a high contrast negative, and a low contrast scene produces
a low contrast negative. Contrast can be controlled by adjusting the film
developing, though it is not recommended for roll films.
If you use the zone system, you can also use the Tone³ to determine
Plus and Minus developments. While beyond the scope of this short piece,
there are many books which cover such procedures in detail.
Whether you use the Tone³ as an educational tool to learn to see
light or a testing tool to standardize your procedures, it can go a long
way to helping you make better photographs. In addition to working with
black-and-white film, it can also be used with color film, as well as
video and digital cameras, to see if there are inherent color shifts or
contrast changes, for white balances and to check gain. Since all three
tones are neutral in color, the Tone³ can aid under almost any lighting
condition. There are virtually no limits to its usefulness.
Tone³ and instructions
copyright ©1999-2000 Bernhard J Suess